8 User feedback
You can often make your app more usable by giving the user more insight into what is happening. This might take the form of better messages when inputs don’t make sense, or progress bars for operations that take a long time. Some feedback occurs naturally through outputs, which you already know how to use, but you’ll often need something else. The goal of this chapter is to show you some of your other options.
We’ll start with techniques for validation, informing the user when an input (or combination of inputs) is in an invalid state. We’ll then continue on to notification, sending general messages to the user, and progress bars, which give details for time consuming operations made up of many small steps. We’ll finish up by discussing dangerous actions, and how you give your users peace of mind with confirmation dialogs or the ability to undo an action.
In this chapter we’ll use shinyFeedback, by Andy Merlino, and waiter, by John Coene. You should also keep your eyes open for shinyvalidate, a package by Joe Cheng, that is currently under development.
8.1 Validation
The first and most important feedback you can give to the user is that they’ve given you bad input. This is analogous to writing good functions in R: user-friendly functions give clear error messages describing what the expected input is and how you have violated those expectations. Thinking through how the user might misuse your app allows you to provide informative messages in the UI, rather than allowing errors to trickle through into the R code and generate uninformative errors.
8.1.1 Validating input
A great way to give additional feedback to the user is via the shinyFeedback package.
Using it is a two step process.
First, you add useShinyFeedback() to the ui.
This sets up the needed HTML and JavaScript for attractive error message display:
ui <- fluidPage(
  shinyFeedback::useShinyFeedback(),
  numericInput("n", "n", value = 10),
  textOutput("half")
)
Then in your server() function, you call one of the feedback functions: feedback(), feedbackWarning(), feedbackDanger(), and feedbackSuccess().
They all have three key arguments:
-
inputId, the id of the input where the feedback should be placed. -
show, a logical determining whether or not to show the feedback. -
text, the text to display.
They also have color and icon arguments that you can use to further customise the appearance.
See the documentation for more details.
Lets see how this comes together in a real example, pretending that we only want to allow even numbers. Figure 8.1 shows the results.
server <- function(input, output, session) {
  half <- reactive({
    even <- input$n %% 2 == 0
    shinyFeedback::feedbackWarning("n", !even, "Please select an even number")
    input$n / 2
  })

  output$half <- renderText(half())
}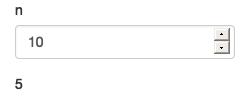
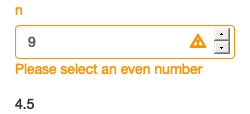
Figure 8.1: Using feedbackWarning() to display warning for invalid inputs. The app on the left shows a valid input, the app on the right shows an invalid (odd) input with warning message. See live at https://hadley.shinyapps.io/ms-feedback.
Notice that the error message is displayed, but the output is still updated.
Typically you don’t want that because invalid inputs are likely to cause uninformative R errors that you don’t want to show to the user.
To stop inputs from triggering reactive changes, you need a new tool: req(), short for “required”.
It looks like this:
server <- function(input, output, session) {
  half <- reactive({
    even <- input$n %% 2 == 0
    shinyFeedback::feedbackWarning("n", !even, "Please select an even number")
    req(even)
    input$n / 2
  })

  output$half <- renderText(half())
}
When the input to req() is not true, it sends a special signal to tell Shiny that the reactive does not have all the inputs that it requires, so it should be “paused”.
We’ll take a brief digression to talk about this before we come back to using it in concert with validate().
8.1.2 Cancelling execution with req()
It’s easiest to understand req() by starting outside of validation.
You may have noticed that when you start an app, the complete reactive graph is computed even before the user does anything.
This works well when you can choose meaningful default values for your inputs.
But that’s not always possible, and sometimes you want to wait until the user actually does something.
This tends to crop up with three controls:
In
textInput(), you’ve usedvalue = ""and you don’t want to do anything until the user types something.In
selectInput(), you’ve provide an empty choice,"", and you don’t want to do anything until the user makes a selection.In
fileInput(), which has an empty result before the user has uploaded anything. We’ll come back to this in Section 9.1.
We need some way to “pause” reactives so that nothing happens until some condition is true.
That’s the job of req(), which checks for required values before allowing a reactive producer to continue.
For example, consider the following app which will generate a greeting in English or Maori.
If you run this app, you’ll see an error, as in Figure 8.2, because there’s no entry in the greetings vector that corresponds to the default choice of "".
ui <- fluidPage(
  selectInput("language", "Language", choices = c("", "English", "Maori")),
  textInput("name", "Name"),
  textOutput("greeting")
)

server <- function(input, output, session) {
  greetings <- c(
    English = "Hello",
    Maori = "Kia ora"
  )
  output$greeting <- renderText({
    paste0(greetings[[input$language]], " ", input$name, "!")
  })
}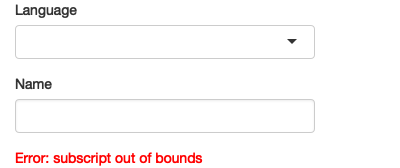
Figure 8.2: The app displays an uninformative error when it is loaded because a language hasn’t been selected yet
We can fix this problem by using req(), as below.
Now nothing will be displayed until the user has supplied values for both language and name, as shown in Figure 8.3.
server <- function(input, output, session) {
  greetings <- c(
    English = "Hello",
    Maori = "Kia ora"
  )
  output$greeting <- renderText({
    req(input$language, input$name)
    paste0(greetings[[input$language]], " ", input$name, "!")
  })
}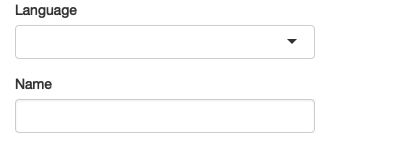
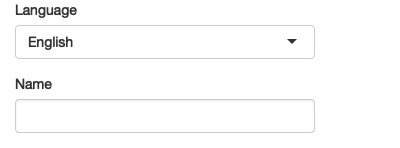
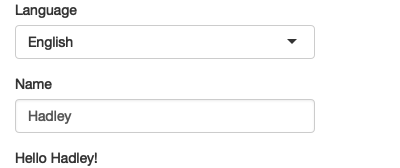
Figure 8.3: By using req(), the output is only shown once both language and name have been supplied See live at https://hadley.shinyapps.io/ms-require-simple2.
req() works by signalling a special condition27.
This special condition causes all downstream reactives and outputs to stop executing.
Technically, it leaves any downstream reactive consumers in an invalidated state.
We’ll come back to this terminology in Chapter 16.
req() is designed so that req(input$x) will only proceed if the user has supplied a value, regardless of the type of the input control28.
You can also use req() with your own logical statement if needed.
For example, req(input$a > 0) will permit computation to proceed when a is greater than 0; this is typically the form you’ll use when performing validation, as we’ll see next.
8.1.3 req() and validation
Let’s combine req() and shinyFeedback to solve a more challenging problem.
I’m going to return to the simple app we made in Chapter 1 which allowed you to select a built-in dataset and see its contents.
I’m going to make it more general and more complex by using textInput() instead of selectInput().
The UI changes very little:
ui <- fluidPage(
  shinyFeedback::useShinyFeedback(),
  textInput("dataset", "Dataset name"),
  tableOutput("data")
)
But the server function needs to get a little more complex.
We’re going to use req() in two ways:
We only want to proceed with computation if the user has entered a value so we do
req(input$dataset).Then we check to see if the supplied name actually exists. If it doesn’t, we display an error message, and then use
req()to cancel computation. Note the use ofcancelOutput = TRUE: normally cancelling a reactive will reset all downstream outputs; usingcancelOutput = TRUEleaves them displaying the last good value. This is important fortextInput()which may trigger an update while you’re in the middle of typing a name.
The results are shown in Figure 8.4.
server <- function(input, output, session) {
  data <- reactive({
    req(input$dataset)

    exists <- exists(input$dataset, "package:datasets")
    shinyFeedback::feedbackDanger("dataset", !exists, "Unknown dataset")
    req(exists, cancelOutput = TRUE)

    get(input$dataset, "package:datasets")
  })

  output$data <- renderTable({
    head(data())
  })
}
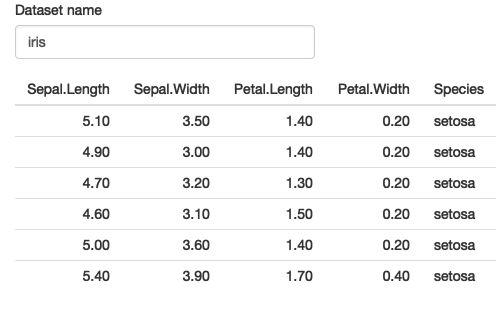
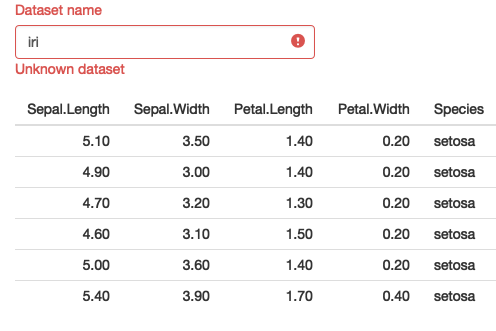
Figure 8.4: On load, the table is empty because the dataset name is empty. The data is shown after we type a valid dataset name (iris), and continues to be shown when we press backspace in order to type a new dataset name. See live at https://hadley.shinyapps.io/ms-require-cancel.
8.1.4 Validate output
shinyFeedback is great when the problem is related to a single input. But sometimes the invalid state is a result of a combination of inputs. In this case it doesn’t really make sense to put the error next to an input (which one would you put it beside?) and instead it makes more sense to put it in the output.
You can do so with a tool built into shiny: validate().
When called inside a reactive or an output, validate(message) stops execution of the rest of the code and instead displays message in any downstream outputs.
The following code shows a simple example where we don’t want to log or square-root negative values.
You can see the results in Figure 8.5.
ui <- fluidPage(
  numericInput("x", "x", value = 0),
  selectInput("trans", "transformation",
    choices = c("square", "log", "square-root")
  ),
  textOutput("out")
)

server <- function(input, output, session) {
  output$out <- renderText({
    if (input$x < 0 && input$trans %in% c("log", "square-root")) {
      validate("x can not be negative for this transformation")
    }

    switch(input$trans,
      square = input$x ^ 2,
      "square-root" = sqrt(input$x),
      log = log(input$x)
    )
  })
}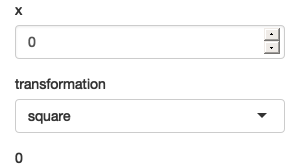
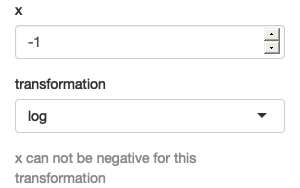
Figure 8.5: If the inputs are valid, the output shows the transformation. If the combination of inputs is invalid, then the output is replaced with an informative message.
8.2 Notifications
If there isn’t a problem and you just want to let the user know what’s happening, then you want a notification.
In Shiny, notifications are created with showNotification(), and stack in the bottom right of the page.
There are three basic ways to use showNotification():
To show a transient notification that automatically disappears after a fixed amount of time.
To show a notification when a process starts and remove it when the process ends.
To update a single notification with progressive updates.
These three techniques are discussed below.
8.2.1 Transient notification
The simplest way to use showNotification() is to call it with a single argument: the message that you want to display.
It’s very hard to capture this behaviour with a screenshot, so go to https://hadley.shinyapps.io/ms-notification-transient if you want to see it in action.
ui <- fluidPage(
  actionButton("goodnight", "Good night")
)
server <- function(input, output, session) {
  observeEvent(input$goodnight, {
    showNotification("So long")
    Sys.sleep(1)
    showNotification("Farewell")
    Sys.sleep(1)
    showNotification("Auf Wiedersehen")
    Sys.sleep(1)
    showNotification("Adieu")
  })
}
By default, the message will disappear after 5 seconds, which you can override by setting duration, or the user can dismiss it earlier by clicking the close button.
If you want to make the notification more prominent, you can set the type argument to one of “message”, “warning”, or “error”.
Figure 8.6 gives a sense of what this looks like.
server <- function(input, output, session) {
  observeEvent(input$goodnight, {
    showNotification("So long")
    Sys.sleep(1)
    showNotification("Farewell", type = "message")
    Sys.sleep(1)
    showNotification("Auf Wiedersehen", type = "warning")
    Sys.sleep(1)
    showNotification("Adieu", type = "error")
  })
}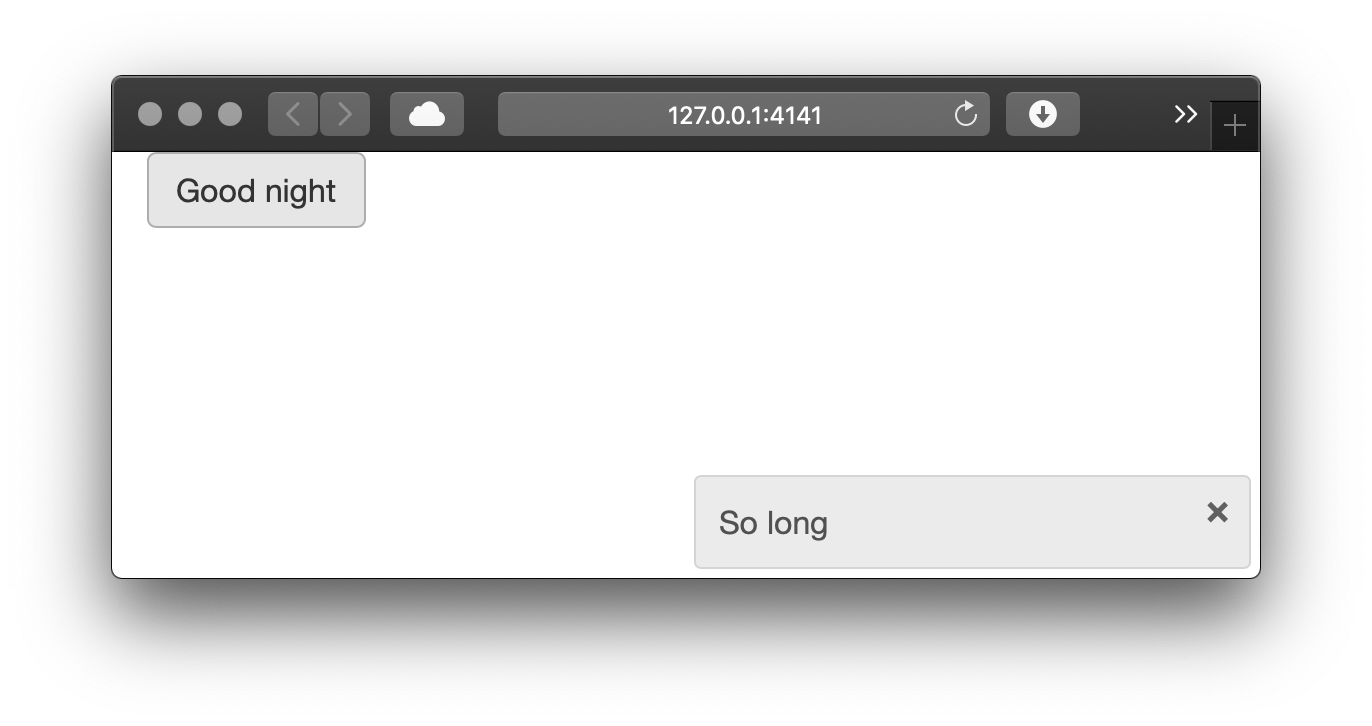
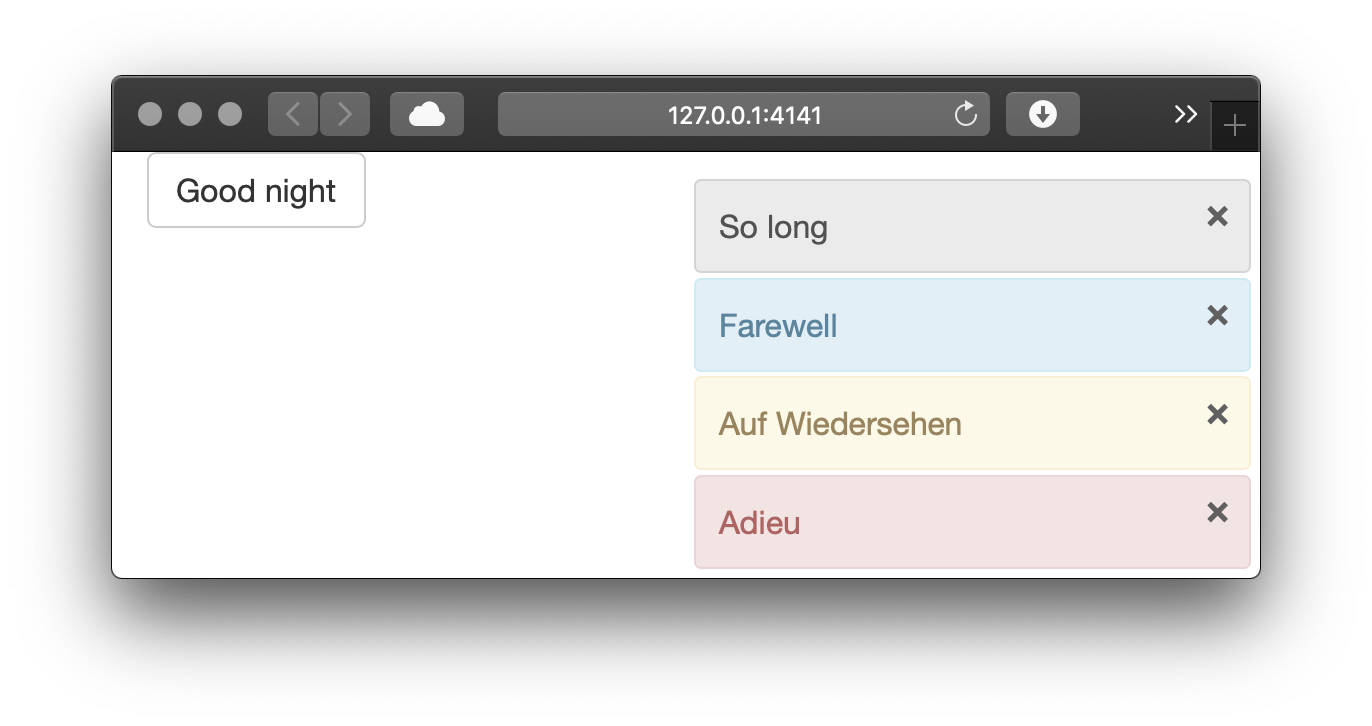
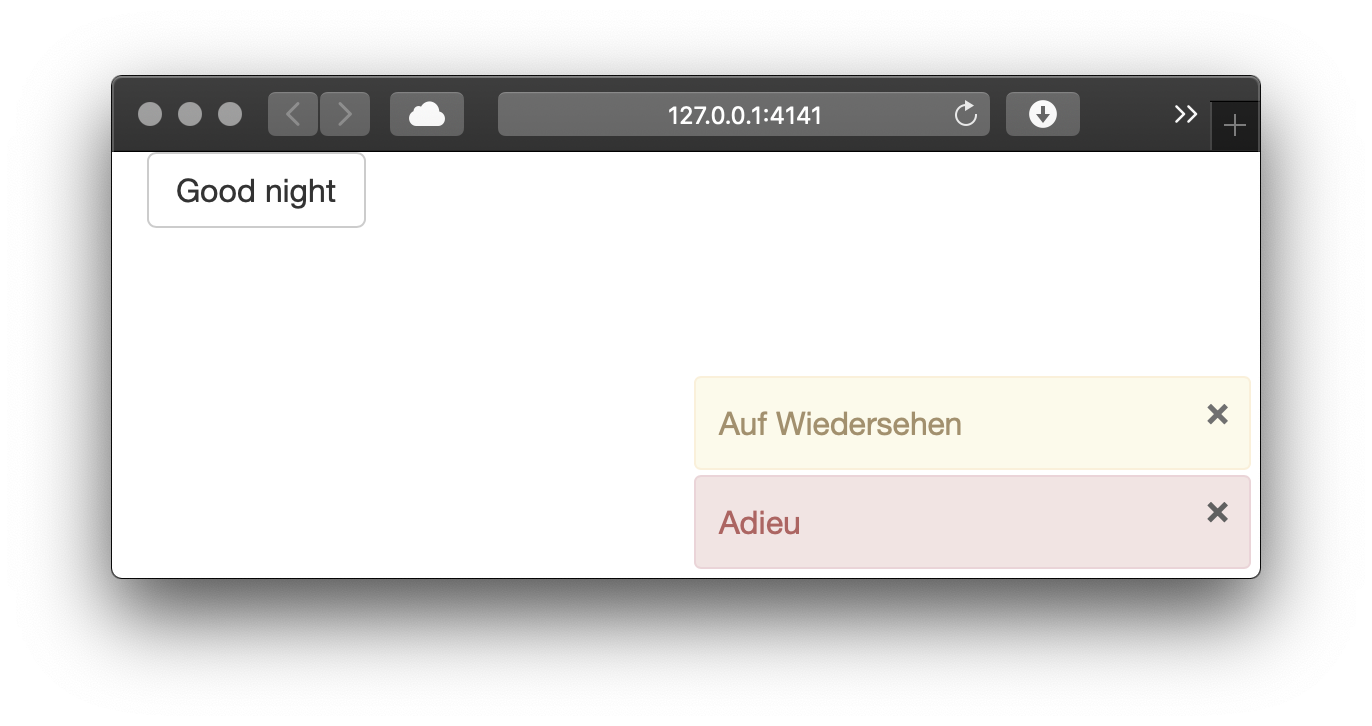
Figure 8.6: The progression of notifications after clicking ‘Good night’: the first notification appears, after three more seconds all notifications are shown, then the notifications start to fade away. See live at https://hadley.shinyapps.io/ms-notify-persistent.
8.2.2 Removing on completion
It’s often useful to tie the presence of a notification to a long-running task. In this case, you want to show the notification when the task starts, and remove the notification when the task completes. To do this, you’ll need to:
Set
duration = NULLandcloseButton = FALSEso that the notification stays visible until the task is complete.Store the
idreturned byshowNotification(), and then pass this value toremoveNotification(). The most reliable way to do so is to useon.exit(), which ensures that the notification is removed regardless of how the task completes (either successfully or with an error). You can learn more abouton.exit()in Changing and restoring state.
The following example puts the pieces together to show how you might keep the user up to date when reading in a large csv file29:
server <- function(input, output, session) {
  data <- reactive({
    id <- showNotification("Reading data...", duration = NULL, closeButton = FALSE)
    on.exit(removeNotification(id), add = TRUE)

    read.csv(input$file$datapath)
  })
}
Generally, these sort of notifications will live in a reactive, because that ensures that the long-running computation is only re-run when needed.
8.2.3 Progressive updates
As you saw in the first example, multiple calls to showNotification() usually create multiple notifications.
You can instead update a single notification by capturing the id from the first call and using it in subsequent calls.
This is useful if your long-running task has multiple subcomponents.
You can see the results in https://hadley.shinyapps.io/ms-notification-updates.
ui <- fluidPage(
  tableOutput("data")
)

server <- function(input, output, session) {
  notify <- function(msg, id = NULL) {
    showNotification(msg, id = id, duration = NULL, closeButton = FALSE)
  }

  data <- reactive({
    id <- notify("Reading data...")
    on.exit(removeNotification(id), add = TRUE)
    Sys.sleep(1)

    notify("Reticulating splines...", id = id)
    Sys.sleep(1)

    notify("Herding llamas...", id = id)
    Sys.sleep(1)

    notify("Orthogonalizing matrices...", id = id)
    Sys.sleep(1)

    mtcars
  })

  output$data <- renderTable(head(data()))
}
8.3 Progress bars
For long-running tasks, the best type of feedback is a progress bar. As well as telling you where you are in the process, it also helps you estimate how much longer it’s going to be: should you take a deep breath, go get a coffee, or come back tomorrow? In this section, I’ll show two techniques for displaying progress bars, one built into Shiny, and one from the waiter package developed by John Coene.
Unfortunately both techniques suffer from the same major drawback: to use a progress bar you need to be able to divide the big task into a known number of small pieces that each take roughly the same amount of time. This is often hard, particularly since the underlying code is often written in C and it has no way to communicate progress updates to you. We are working on tools in the progress package so that packages like dplyr, readr, and vroom will one day generate progress bars that you can easily forward to Shiny.
8.3.1 Shiny
To create a progress bar with Shiny, you need to use withProgress() and incProgress().
Imagine you have some slow running code that looks like this30:
for (i in seq_len(step)) {
  x <- function_that_takes_a_long_time(x)
}
You start by wrapping it in withProgress().
This shows the progress bar when the code starts, and automatically removes it when it’s done:
withProgress({
  for (i in seq_len(step)) {
    x <- function_that_takes_a_long_time(x)
  }
})
Then call incProgress() after each step:
withProgress({
  for (i in seq_len(step)) {
    x <- function_that_takes_a_long_time(x)
    incProgress(1 / length(step))
  }
})
The first argument of incProgress() is the amount to increment the progress bar.
By default, the progress bar starts at 0 and ends at 1, so the incrementing by 1 divided by the number of steps will ensure that the progress bar is complete at the end of the loop.
Here’s how that might look in a complete Shiny app, as shown in Figure 8.7.
ui <- fluidPage(
  numericInput("steps", "How many steps?", 10),
  actionButton("go", "go"),
  textOutput("result")
)

server <- function(input, output, session) {
  data <- eventReactive(input$go, {
    withProgress(message = "Computing random number", {
      for (i in seq_len(input$steps)) {
        Sys.sleep(0.5)
        incProgress(1 / input$steps)
      }
      runif(1)
    })
  })

  output$result <- renderText(round(data(), 2))
}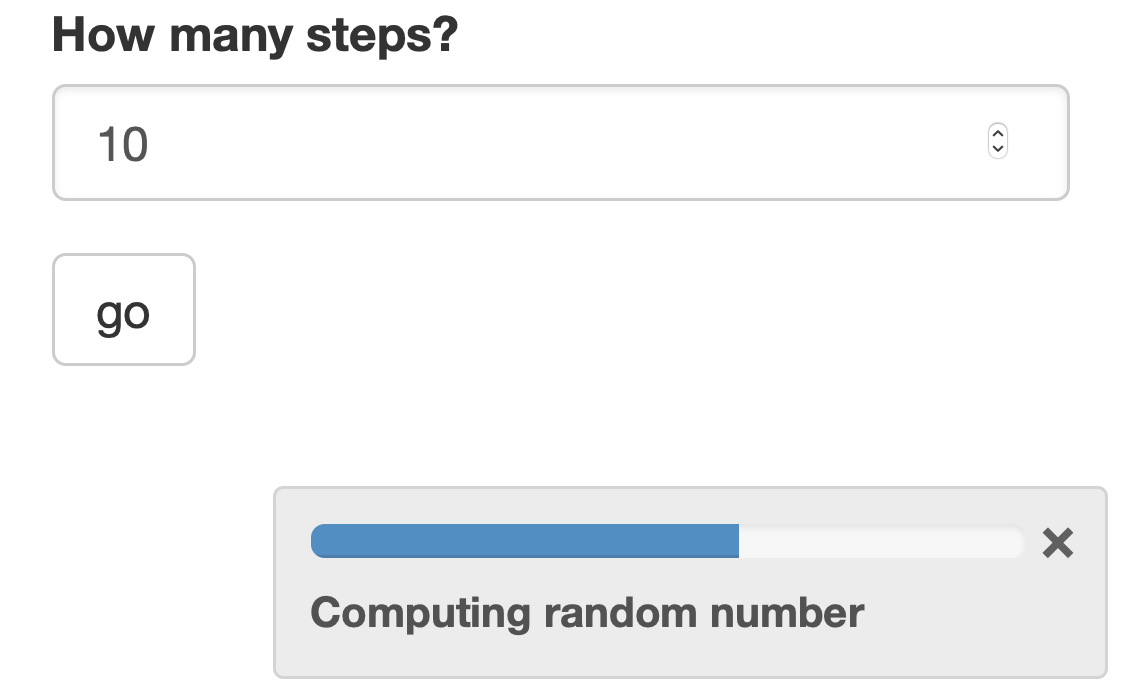
Figure 8.7: A progress bar helps indicate how much longer a calculation has to run. See live at https://hadley.shinyapps.io/ms-progress.
A few things to note:
I used the optional
messageargument to add some explanatory text to the progress bar.I used
Sys.sleep()to simulate a long running operation; in your code this would be a slow function.I allowed the user to control when the event starts by combining a button with
eventReactive(). This is good practice for any task that requires a progress bar.
8.3.2 Waiter
The built-in progress bar is great for the basics, but if you want something that provides more visual options, you might try the waiter package.
Adapting the above code to work with Waiter is straightforward.
In the UI, we add use_waitress():
ui <- fluidPage(
  waiter::use_waitress(),
  numericInput("steps", "How many steps?", 10),
  actionButton("go", "go"),
  textOutput("result")
)
The interface for waiter’s progress bars are a little different. The waiter package uses an R6 object to bundle all progress related functions into a single object. If you’ve never used an R6 object before, don’t worry too much about the details; you can just copy and paste this template. The basic lifecycle looks like this:
# Create a new progress bar
waitress <- waiter::Waitress$new(max = input$steps)
# Automatically close it when done
on.exit(waitress$close())

for (i in seq_len(input$steps)) {
  Sys.sleep(0.5)
  # increment one step
  waitress$inc(1)
}
And we can use it in a Shiny app as follows:
server <- function(input, output, session) {
  data <- eventReactive(input$go, {
    waitress <- waiter::Waitress$new(max = input$steps)
    on.exit(waitress$close())

    for (i in seq_len(input$steps)) {
      Sys.sleep(0.5)
      waitress$inc(1)
    }

    runif(1)
  })

  output$result <- renderText(round(data(), 2))
}
The default display is a thin progress bar at the top of the page (which you can see https://hadley.shinyapps.io/ms-waiter), but there are a number of ways to customise the output:
-
You can override the default
themeto use one of:-
overlay: an opaque progress bar that hides the whole page -
overlay-opacity: a translucent progress bar that covers the whole page -
overlay-percent: an opaque progress bar that also displays a numeric percentage.
-
-
Instead of showing a progress bar for the entire page, you can overlay it on an existing input or output by setting the
selectorparameter, e.g.:waitress <- Waitress$new(selector = "#steps", theme = "overlay")
8.3.3 Spinners
Sometimes you don’t know exactly how long an operation will take, and you just want to display an animated spinner that reassures the user that something is happening.
You can also use the waiter package for this task; just switch from using a Waitress to using a Waiter:
ui <- fluidPage(
  waiter::use_waiter(),
  actionButton("go", "go"),
  textOutput("result")
)

server <- function(input, output, session) {
  data <- eventReactive(input$go, {
    waiter <- waiter::Waiter$new()
    waiter$show()
    on.exit(waiter$hide())

    Sys.sleep(sample(5, 1))
    runif(1)
  })
  output$result <- renderText(round(data(), 2))
}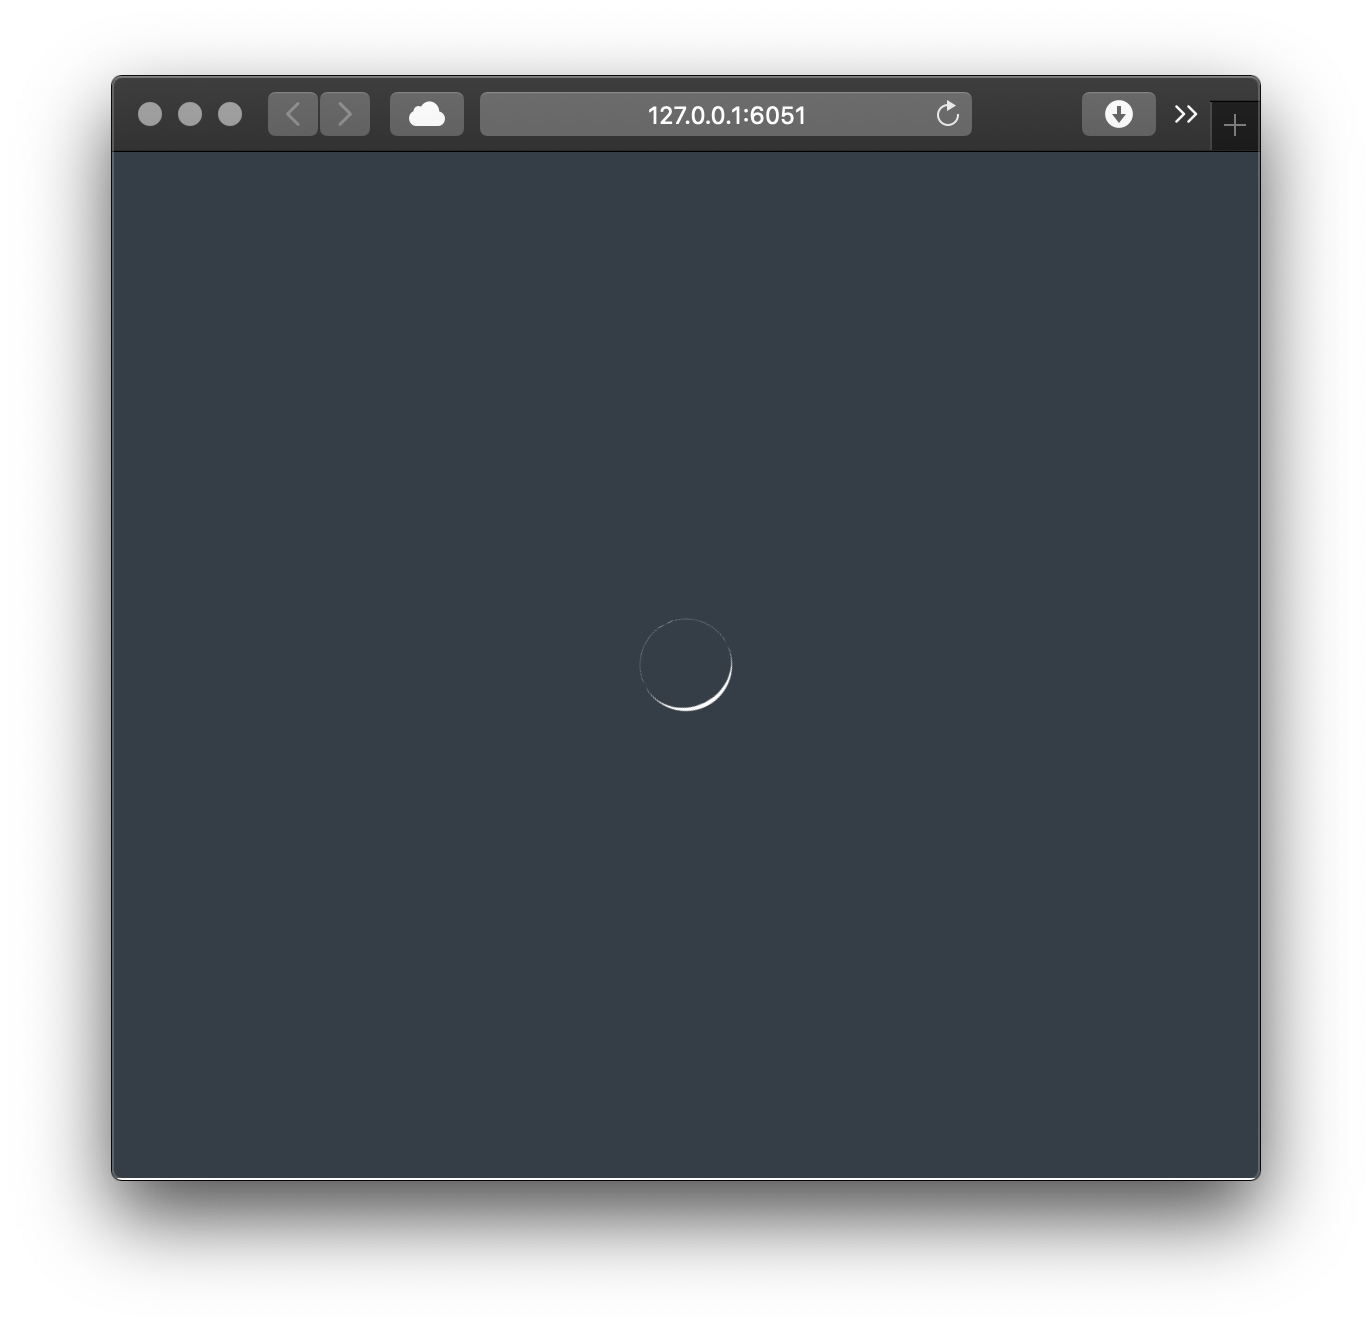
Figure 8.8: A ‘Waiter’ displays a whole app spinner while something is happen. See live at https://hadley.shinyapps.io/ms-spinner-1.
Like Waitress, you can also use Waiters for specific outputs.
These waiters can automatically remove the spinner when the output updates, so the code is even simpler:
ui <- fluidPage(
  waiter::use_waiter(),
  actionButton("go", "go"),
  plotOutput("plot"),
)

server <- function(input, output, session) {
  data <- eventReactive(input$go, {
    waiter::Waiter$new(id = "plot")$show()

    Sys.sleep(3)
    data.frame(x = runif(50), y = runif(50))
  })

  output$plot <- renderPlot(plot(data()), res = 96)
}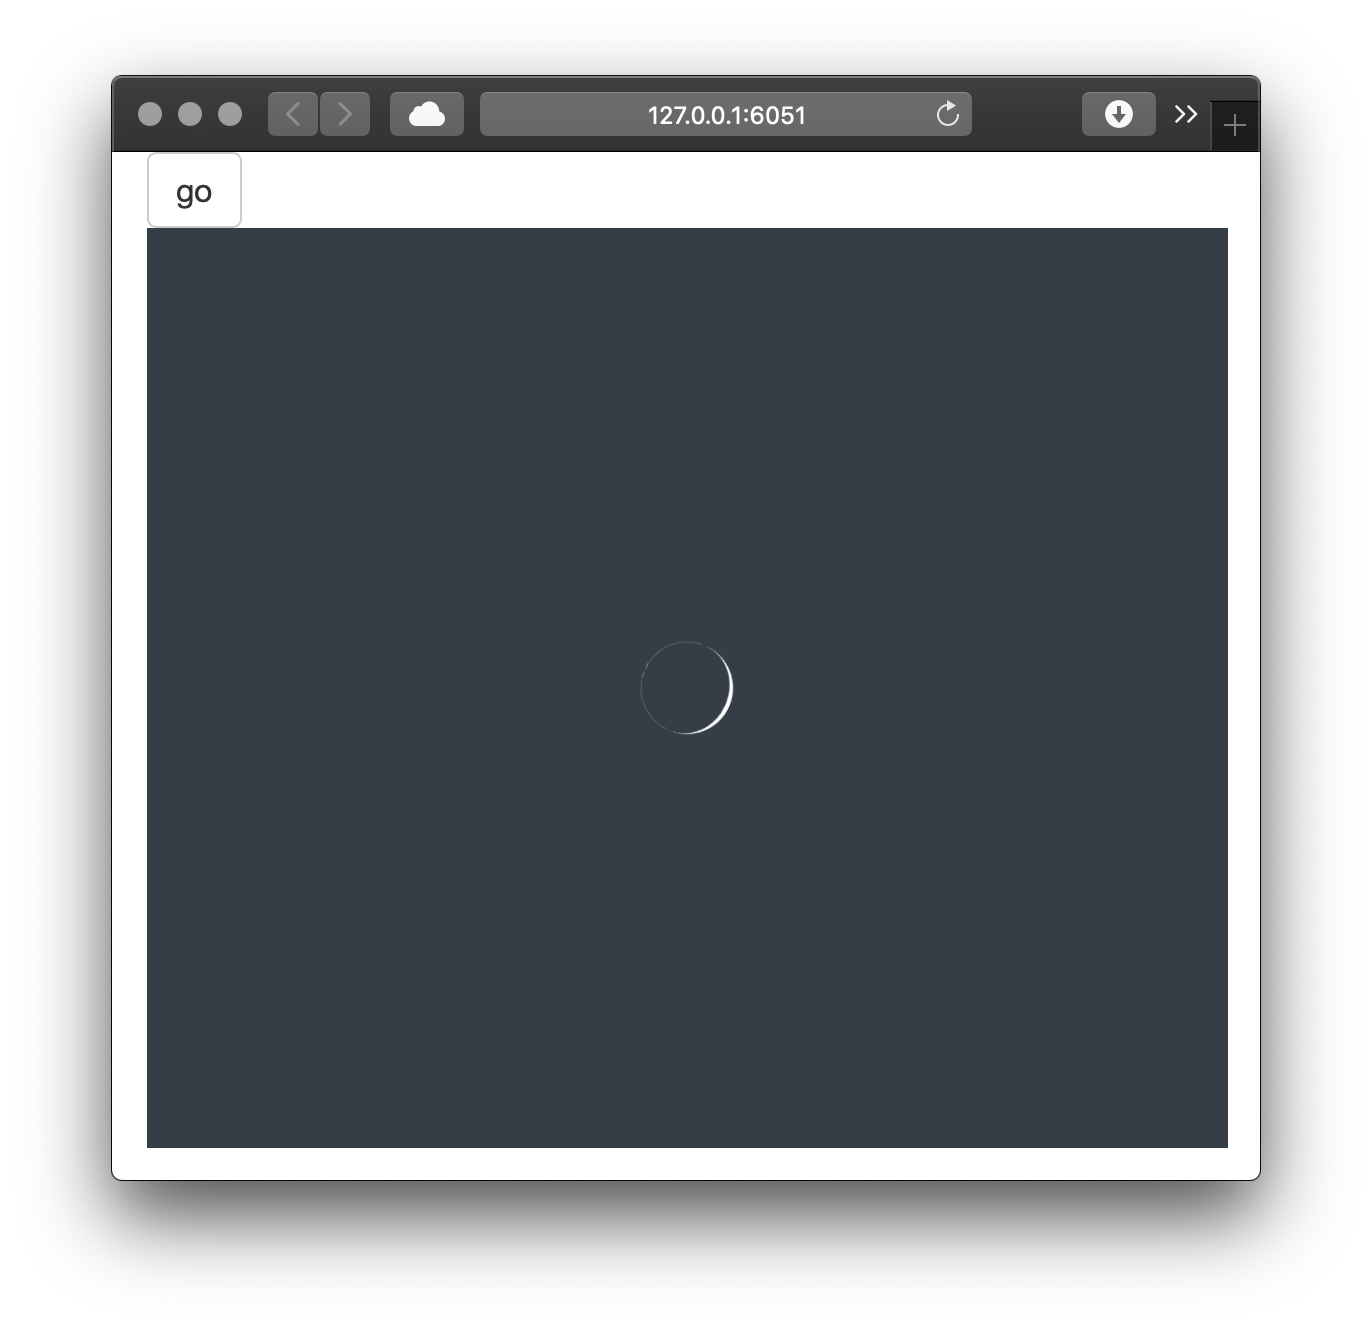
Figure 8.9: You can instead display a spinner for single output. See live at https://hadley.shinyapps.io/ms-spinner-2.
The waiter package provides a large variety of spinners to choose from; see your options at ?waiter::spinners and then choose one with (e.g.) Waiter$new(html = spin_ripple()).
An even simpler alternative is to use the shinycssloaders package by Dean Attali.
It uses JavaScript to listen to Shiny events, so it doesn’t even need any code on the server side.
Instead, you just use shinycssloaders::withSpinner() to wrap outputs that you want to automatically get a spinner when they have been invalidated.
library(shinycssloaders)

ui <- fluidPage(
  actionButton("go", "go"),
  withSpinner(plotOutput("plot")),
)
server <- function(input, output, session) {
  data <- eventReactive(input$go, {
    Sys.sleep(3)
    data.frame(x = runif(50), y = runif(50))
  })

  output$plot <- renderPlot(plot(data()), res = 96)
}
8.4 Confirming and undoing
Sometimes an action is potentially dangerous, and you either want to make sure that the user really wants to do it, or you want to give them the ability to back out before it’s too late. The three techniques in this section lay out your basic options and give you some tips for how you might implement them in your app.
8.4.1 Explicit confirmation
The simplest approach to protecting the user from accidentally performing a dangerous action is to require an explicit confirmation.
The easiest way is to use a dialog box which forces the user to pick from one of a small set of actions.
In Shiny, you create a dialog box with modalDialog().
This is called a “modal” dialog because it creates a new “mode” of interaction; you can’t interact with the main application until you have dealt with the dialog.
Imagine you have a Shiny app that deletes some files from a directory (or rows in a database etc). This is hard to undo so you want to make sure that the user is really sure. You could create a dialog box, as shown in Figure 8.10, that requires an explicit confirmation as follows:
modal_confirm <- modalDialog(
  "Are you sure you want to continue?",
  title = "Deleting files",
  footer = tagList(
    actionButton("cancel", "Cancel"),
    actionButton("ok", "Delete", class = "btn btn-danger")
  )
)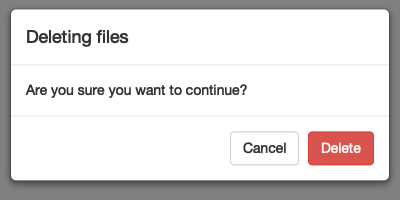
Figure 8.10: A dialog box checking whether or not you want to delete some files.
There are a few small, but important, details to consider when creating a dialog box:
What should you call the buttons? It’s best to be descriptive, so avoid yes/no or continue/cancel in favour of recapitulating the key verb.
How should you order the buttons? Do you put cancel first (like the Mac), or continue first (like Windows)? Your best option is to mirror the platform that you think most people will be using.
Can you make the dangerous option more obvious? Here I’ve used
class = "btn btn-danger"to style the button prominently.
Jakob Nielsen has more good advice at https://www.nngroup.com/articles/ok-cancel-or-cancel-ok/.
Let’s use this dialog in a real (if very simple) app. Our UI exposes a single button to “delete all the files”:
ui <- fluidPage(
  actionButton("delete", "Delete all files?")
)
There are two new ideas in the server():
We use
showModal()andremoveModal()to show and hide the dialog.We observe events generated by the UI from
modal_confirm. These objects aren’t created statically in theui, but are instead dynamically added in theserver()byshowModal(). You’ll see that idea in much more detail in Chapter 10.
server <- function(input, output, session) {
  observeEvent(input$delete, {
    showModal(modal_confirm)
  })

  observeEvent(input$ok, {
    showNotification("Files deleted")
    removeModal()
  })
  observeEvent(input$cancel, {
    removeModal()
  })
}
8.4.2 Undoing an action
Explicit confirmation is most useful for destructive actions that are only performed infrequently. You should avoid it if you want to reduce the errors made by frequent actions. For example, this technique would not work for twitter — if there was a dialog box that said “Are you sure you want to tweet this?” you would soon learn to automatically click yes, and still feel the same feeling of regret when you notice a typo 10s after tweeting.
In this situation a better approach is to wait few seconds before actually performing the action, giving the user a chance to notice any problems and undo them. This isn’t really an undo (since you’re not actually doing anything), but it’s an evocative word that users will understand.
I illustrate the technique with a website that I personally wish had an undo button: Twitter. The essence of the Twitter UI is very simple: there’s a text area to compose your tweet and a button to send it:
ui <- fluidPage(
  textAreaInput("message",
    label = NULL,
    placeholder = "What's happening?",
    rows = 3
  ),
  actionButton("tweet", "Tweet")
)
The server function is quite complex and requires some techniques that we haven’t talked about.
Don’t worry too much about understanding the code, focus on the basic idea: we use some special arguments to observeEvent() to run some code after a few seconds.
The big new idea is that we capture the result of observeEvent() and save it to a variable; this allows us to destroy the observer so the code that would really send the tweet is never run.
You can try out the live app at https://hadley.shinyapps.io/ms-undo.
runLater <- function(action, seconds = 3) {
  observeEvent(
    invalidateLater(seconds * 1000), action,
    ignoreInit = TRUE,
    once = TRUE,
    ignoreNULL = FALSE,
    autoDestroy = FALSE
  )
}

server <- function(input, output, session) {
  waiting <- NULL
  last_message <- NULL

  observeEvent(input$tweet, {
    notification <- glue::glue("Tweeted '{input$message}'")
    last_message <<- input$message
    updateTextAreaInput(session, "message", value = "")

    showNotification(
      notification,
      action = actionButton("undo", "Undo?"),
      duration = NULL,
      closeButton = FALSE,
      id = "tweeted",
      type = "warning"
    )

    waiting <<- runLater({
      cat("Actually sending tweet...\n")
      removeNotification("tweeted")
    })
  })

  observeEvent(input$undo, {
    waiting$destroy()
    showNotification("Tweet retracted", id = "tweeted")
    updateTextAreaInput(session, "message", value = last_message)
  })
}
8.4.3 Trash
For actions that you might regret days later, a more sophisticated pattern is to implement something like the trash or recycling bin on your computer. When you delete a file, it isn’t permanently deleted but instead is moved to a holding cell, which requires a separate action to empty. This is like the “undo” option on steroids; you have a lot of time to regret your action. It’s also a bit like the confirmation; you have to do two separate actions to make deletion permanent.
The primary downside of this technique is that it is substantially more complicated to implement (you have to have a separate “holding cell” that stores the information needed to undo the action), and requires regular intervention from the user to avoid accumulating. For that reason, I think it’s beyond the scope of all but the most complicated Shiny apps, so I’m not going to show an implementation here.
8.5 Summary
This chapter has given you a number of tools to help communicate to the user what’s happening with your app. In some sense, these techniques are mostly optional. But while your app will work without them, their thoughtful application can have a huge impact on the quality of the user experience. You can often omit feedback when you’re the only user of an app, but the more people use it, the more that thoughtful notification will pay off.
In the next chapter, you’ll learn how to transfer files to and from the user.