17 General guidelines
17.1 Introduction
This chapter introduces the most important software engineering skills you’ll need when writing Shiny apps: code organisation, testing, dependency management, source code control, continuous integration, and code reviews. These skills are not specific to Shiny apps, but you’ll need to learn a bit about all of them if you want to write complex apps that get easier to maintain over time, not harder.
Improving your software engineering skills is a lifelong journey. Expect to have frustrations as you start learning them, but understand that everyone experiences the same issues, and if you persevere you’ll get past them. Most people go through the same evolution when learning a new technique: “I don’t understand it and have to look it up every time I use it” to “I vaguely understand it but still read the documentation a lot” to eventually “I understand it and can use it fluidly”. It takes time and practice to get to the final stage.
I recommend setting aside some time each week to practice your software development skills. During this time, try to avoid touching the behaviour or appearance of your app, but instead focus your efforts on making the app easier to understand and develop. This will make your app easier to change in the future, and as you improve your software development skills your first attempt at an app will also become higher quality.
(Thanks to my colleague Jeff Allen for contributing the bulk of this chapter)
17.2 Code organization
Any fool can write code that a computer can understand. Good programmers write code that humans can understand. — Martin Fowler
One of the most obvious ways to improve the quality of an application is to improve the readability and understandability of its code. The best programmers in the world can’t maintain a code-base that they can’t understand, so this is a good place to start.
Being a good programmer means developing empathy for others who will need to interact with this code-base in the future (even if it’s just future-you!). Like all forms of empathy, this takes practice and becomes easier only after you’ve done it many times. Over time, you’ll start to notice that certain practices improve the readability of your code. There are no universal rules, but some general guidelines include:
Are the variable and function names clear and concise? If not, what names would better communicate the intent of the code?
Do I have comments where needed to explain complex bits of code?
Does this whole function fit on my screen or could it be printed on a single piece of paper? If not, is there a way to break it up into smaller pieces?
Am I copying-and-pasting the same block of code many times throughout my app? If so, is there a way to use a function or a variable to avoid the repetition?
Are all the parts of my application tangled together, or can I manage the different components of my application in isolation?
There’s no silver bullet to address all of these points—and many times they involve subjective judgement calls—but there are two particularly important tools:
Functions, the topic of Chapter 18, allow you to reduce duplication in your UI code, make your server functions easier to understand and test, and allow you to more flexibly organise your app code.
Shiny modules, the topic of Chapter 19, make it possible to write isolated, re-usable code, that coordinates front end and back end behaviour. Modules allow you to gracefully separate concerns so that (e.g.) individual pages in your application can operate independently, or repeated components no longer need to be copied and pasted.
17.3 Testing
Developing a test plan for an application is critical to ensure its ongoing stability. Without a test plan, every change jeopardizes the application. When the application is small enough that you can hold it all in your head, you might feel that there’s no need for an additional test plan. And sure, testing very simple apps can seem like more trouble than its worth. However, the lack of a plan is likely to cause pain as soon as someone else starts contributing to your app, or when you’ve spent enough time away from it that you’ve forgotten how it all fits together.
A testing plan could be entirely manual. A great place to start is a simple text file giving a script to follow to check that all is well. However, that script will have to grow as the application becomes more complex, and you’ll either spend more and more of your time manually testing the application, or you’ll start skipping some of the script.
So the next step is to start to automate some of your testing. Automation takes time to set up, but it pays off over time because you can run the tests more frequently. For that reason, various forms of automated testing have been developed for Shiny, as outlined in Chapter 21. As that chapter will explain, you can develop:
- Unit tests that confirm the correct behaviour of an individual function.
- Integration tests to confirm the interactions between reactives.
- Functional tests to validate the end-to-end experience from a browser
- Load tests to ensure that the application can withstand the amount of traffic you anticipate for it.
The beauty of writing an automated test is that once you’ve taken the time to write it, you’ll never need to manually test that portion of the application again. You can even leverage continuous integration (more on that shortly) to run these tests every time you make a change to your code before publishing the application.
17.4 Dependency management
If you’ve ever tried to reproduce some analysis in R written by someone else, or even tried to rerun some analysis or Shiny application you wrote some time ago, you may have run into trouble around dependencies. An app’s dependencies are anything beyond the source code that it requires to run. These could include files on the hard drive, an external database or API, or other R packages that are used by the app.
For any analysis that you may want to reproduce in the future, consider using renv which enables you to create reproducible R environments. Using renv, you can capture the exact package versions that your application uses so that when you go to use this application on another computer, you can use exactly the same package versions. This is vital for apps run in production, not just because it gets the versions right on the first run, but because it also isolates your app from version changes over time.
Another tool for managing dependencies is the config package. The config package doesn’t actually manage dependencies itself, but it does provide a convenient place for you to track and manage dependencies other than R packages. For instance, you might specify the path to a CSV file that your application depends on, or the URL of an API that you require. Having these enumerated in the config file gives you a single place where you can track and manage these dependencies. Even better, it enables you to create different configurations for different environments. For example, if your application analyses a database with lots of data, you might choose to configure a few different environments:
In the production environment, you connect the app to the real “production” database.
In a test environment, you can configure the app to use a test database so that you properly exercise the database connections in your tests but you don’t risk corrupting your production database if you accidentally make a change that corrupts the data.
In development, you might configure the application to use a small CSV with a subset of data to allow for faster iterating.
Lastly, be wary of making assumptions about the local file system.
If your code has references to data at C:\data\cars.csv or ~/my-projects/genes.rds, for example, you need to realise that it’s very unlikely that these files will exist on another computer.
Instead, either use a path relative to the app directory (e.g. data/cars.csv or genes.rds), or use the config package to make the external path explicit and configurable.
17.5 Source code management
Anyone who’s been programming for a long time has inevitably arrived at a state where they’ve accidentally broken their app and want to roll back to a previous working state. This is incredibly arduous when done manually. Fortunately, however, you can rely on a “version-control system” that makes it easy to track atomic changes, roll back to previous work, and integrate the work of multiple contributors.
The most popular version-control system in the R community is Git. Git is typically paired with GitHub, a website that makes it easy to share your git repos with others. It definitely takes work to become proficient with Git and GitHub, but any experienced developer will confirm that the effort is well worth it. If you’re new to git, I’d highly recommend starting with Happy Git and GitHub for the useR, by Jenny Bryan.
17.6 Continuous integration/deployment (CI, CD)
Once you are using a version control system and have a robust set of automated tests, you might benefit from continuous integration (CI). CI is a way to perpetually validate that the changes you’re making to your application haven’t broken anything. You can use it retroactively (to notify you if a change you just made broke your application) or proactively (to notify you if a proposed change would break your app).
There are a variety of services that can connect to a Git repo and automatically run tests when you push a new commit or propose changes. Depending on where your code is hosted, you can consider GitHub actions, Travis CI, Azure Pipelines, AppVeyor, Jenkins, or GitLab CI/CD, to name a few.
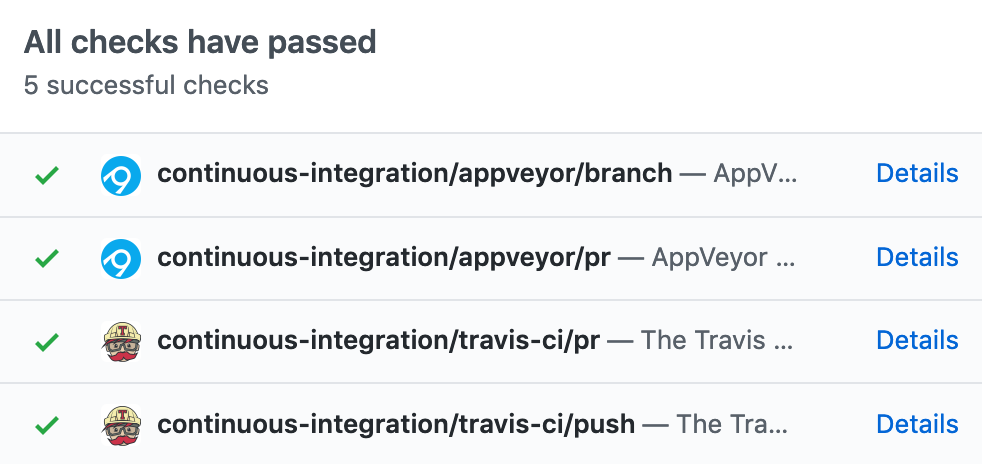
Figure 17.1: An example CI run, showing successful results across four independent testing environments
Figure 17.1 shows what this looks like when a CI system is connected to GitHub to test pull requests. As you can see, all the CI tests show green checks, meaning that each of the automated test environments were successful. If any of the tests had failed, you would be alerted to the failure before you merge the changes into your app. Having a CI process not only prevents experienced developers from making accidental mistakes, but also helps new contributors feel confident in their changes.
17.7 Code reviews
Many software companies have found the benefits of having someone else review code before it’s formally incorporated into a code base. This process of “code review” has a number of benefits:
Catches bugs before they get incorporated into the application making them much less expensive to fix.
Offers teaching opportunities — programmers at all levels often learn something new by reviewing others’ code or by having their code reviewed.
Facilitates cross-pollination and knowledge sharing across a team to eliminate having only one person who understands the app.
The resulting conversation often improves the readability of the code.
Typically, a code review involves someone other than you, but you can still benefit even if it’s only you. Most experienced developers will agree that taking a moment to review your own code often reveals some small flaw, particularly if you can let it sit for at least a few hours between writing and review.
Here are few questions to hold in your head when reviewing code:
Do new functions have concise but evocative names?
Are there parts of the code you find confusing?
What areas are likely to change in the future, and would particularly benefit from automated testing?
Does the style of the code match the rest of the app? (Or even better, your group’s documented code style.)
If you’re embedded in an organisation with a strong engineering culture, setting up code reviews for data science code should be relatively straightforward, and you’ll have existing tools and experience to draw on. If you’re in an organisation that has few other software engineers, you may need to do more convincing.
Two resources I’d recommend:
17.8 Summary
Now that you’ve learned a little bit of the software engineer mindset, the next chapters are going to dive into the details of function writing, testing, security, and performance as they apply to Shiny apps. You’ll need to read Chapter 18 before the other chapters, but otherwise you can skip around.